Overview
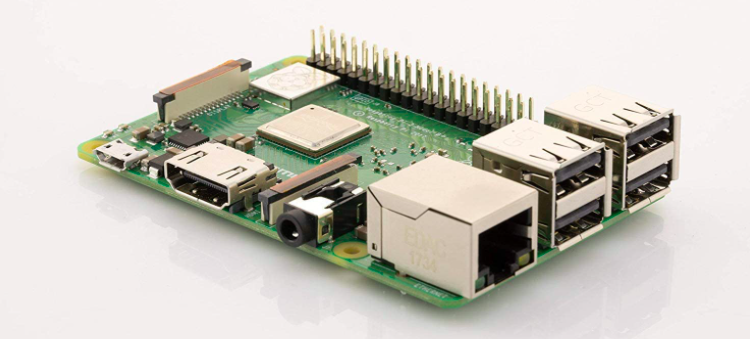
For those who don’t know what a Raspberry Pi is, it’s a small and versatile computer that’s available for a very low cost and is perfect for a range of cord cutter DIY projects. The Raspberry Pi can be used to run media centers such as Kodi and Plex, meaning it’s a cheap way to set up a home entertainment system. It’s only available to buy online, and there are a few different versions available. Here’s the difference between each model, and how to get set up with a few media centers once you’ve got your device.
Raspberry Pi 3 Model B
This model is one of the more recent designs, and it has additional functions compared to previous editions such as Bluetooth and increased processing power. There is also a quad-core processor. When it comes to the system behind the naming, the 3 refers to this Pi being from the third generation. The B is the full sized Pi, and the A and zero will be smaller and less powerful.
Raspberry Pi 2 Model B
The 2 model is from the second generation of Pi products, and features a quad-core processor like the Pi 3. However, it doesn’t feature Bluetooth functionality. It’s an improvement on the Raspberry Pi 1 in that it has 1GB RAM and a 900MHz quad-core ARM Cortex-A7 CPU. Like the Pi 1 Model B+, other features include 100 Base Ethernet, 4 USB ports and a full HDMI port.
Raspberry Pi 1 Model B+
The oldest version of Raspberry Pi model B that is available is the Pi 1, and even this model can be difficult to get a hold of these days. Some cord cutter DIY projects may be more difficult if you use this model; for example, you may need to install an updated version of an operating system to progress with your work. The upside to this model is that it’s fairly cheap to buy, wherever it is available online.
Raspberry Pi Zero
Like the Raspberry Pi 1 Model B+, the Raspberry Pi Zero is getting increasingly difficult to find online due to more updated models being available for purchase. If you do manage to find this device, it shouldn’t set you back more than $5, which is an absolute bargain if you can get it set up with a streaming services project. This device features a single-core CPU and 512MB of RAM. If you have a simple project which requires a small amount of memory and not too much power, then this model could work well for you.
Raspberry Pi 1 Model A+
This is the slightly improved version of the original small Pi, the Raspberry Pi A. While it’s larger and less powerful than the Zero, it does have features such as GPIO pins and an audio jack. This model isn’t recommended for home entertainment projects due to its lack of power, so it would be better to use a B model instead.
Equipment for installing Kodi on Raspberry Pi
- Raspberry Pi device – a newer model such as the Raspberry Pi 3 Model B is recommended
- A power source – namely the 5V micro USB supply
- HDMI cable – to connect the Pi to your TV
- Micro SD/SD card (depending on the Pi model) – this should be 2GB minimum
- USB keyboard, mouse, controller – to assist with setting up the device
- A desktop computer or laptop with an SD card reader – to set up the device
- A USB storage device – have one of these available if you have a large video library
- Ethernet cable or wireless dongle – as Kodi has add-ons which let you stream online content, one of these will let you connect your Pi to the internet
How to install Kodi on Raspberry Pi (with XBian OS)
- Insert your SD card into your computer or laptop SD card reader (with micro SD cards, this may require an adapter).
- Download the XBian installer – this is a lightweight OS which includes Kodi, and once it’s installed on the Pi, XBian will boot directly to Kodi. You will need to navigate to the XBian website and download the right file for your operating system.
- Unzip the XBian installer and run the file. Windows users will need to run the installer as an administrator, while Mac users will have to press CTRL and click, then select open, to get their device to trust the program.
- Choose the right Raspberry Pi version for the installation, and select the destination as your SD card, then let the installer run.
- Connect your equipment. This step requires putting the SD card into the Pi, putting the HDMI cable into the TV, connecting any USB file storage and ethernet cables, and connecting the power.
- Let the XBian OS load up, and then you’ll be ready to go. You can download add-ons, add files from your external storage to your library and more. Lightweight Kodi skins are recommended for the Pi, as it’s a device with relatively low power. You can get further help with the Kodi wiki, Raspberry Pi wiki or XBian Getting Started page. An easy way to control the Kodi-Pi is via the Kodi remote app, which is available for mobiles and tablets. Alternatively, you can use a game controller or keyboard and mouse.
Equipment for installing Plex on Raspberry Pi
- Raspberry Pi device – the Raspberry Pi B+ or above is recommended
- A micro USB power source – preferably one that provides 5V and 2 amps
- HDMI cable – to connect the Pi to a TV or monitor
- Micro SD/SD card – this should be a minimum of 4GB and act as the mini hard drive for the Pi
- USB keyboard, mouse or controller – to assist with the setup and control of the device
- Laptop or computer with SD card reader – this is required to put Plex on the micro SD/SD card. Those with a micro SD card may need a micro SD to SD adapter
- Ethernet cable or wireless dongle – provides an internet connection for streaming through the Plex channels and connecting to your server
- A case – this is optional but adds protection to your Pi device
How to install Plex on Raspberry Pi (with RasPlex OS)
- Plug in your micro SD/SD card to your desktop laptop or computer, using an adapter if applicable .
- Download the RasPlex installer which matches your OS. While a lightweight OS is required for Pi installation, you will only see Plex when you boot the system up.
- Run the RasPlex installer – Windows users will need to run the file as an administrator, and Mac owners will need to double click on the .dmg file to install it before running it.
- Select the correct version and destination; in other words, choose the Raspberry Pi version you have and ensure that RasPlex is downloaded somewhere convenient on your desktop before moving it to the correct destination. Once it’s downloaded, click on Write SD Card to get the program written over to this destination.
- Plug all of your equipment in – this means putting the micro SD/SD card with RasPlex loaded onto it in your Raspberry Pi, plugging in the HDMI cable, connecting the ethernet cable or WiFi dongle if you’re using these, and the USB controller or keyboard and mouse. Ensure the power is the last object to be plugged in.
- Set up Plex once it’s loaded up on the Pi. This involves steps such as setting up the WiFi network and connecting to your Plex media server.
Summary
The Raspberry Pi is a low-cost and lightweight device which makes many cord cutter streaming service projects easy to complete on a DIY level. You’ll be saving money on other hardware which may be more expensive and setting up a system in a bespoke way. Furthermore, Kodi and Plex are just some of the programs which can be loaded onto this device. Computers like the Pi are a blessing for tech enthusiasts – or newbies who enjoy streaming content – to get stuck into the world of customisable streaming services.